There are no items in your cart
Add More
Add More
| Item Details | Price | ||
|---|---|---|---|

This guide offers a complete overview of network automation with NETCONF, including detailed instructions on NETCONF XML configuration
21-05-2024
· Enable NETCONF Protocol on Cisco IOS XR and IOS XE devices
· Verify the NETCONF Protocol by using CLI
· Verify the NETCONF Protocol by using a SSH session
· Explore the NETCONF YANG data model
· List different NETCONF RPC requests.
· List different framing NETCONF framing mechanism in Cisco IOS XR and IOS XE devices
· Read and write NETCONF Database in a raw session

All routers and StudentPC connect to an out-of-band management network, as shown in the following management network topology. The management interface in routers is assigned to the VRF Mgmt-intf to isolate the management network.

| DEVICE | CREDENTIALS |
| PE1 | Username: cisco Password : cisco |
| PE2 | Username: cisco Password : cisco |
| PE3 | Username: cisco Password : cisco |
| P1 | Username: cisco Password : cisco |
| P2 | Username: cisco Password : cisco |
| PC | Username: student Password : 1234QWer |
| DEVICE | DESCRIPTION | IP ADDRESS |
| P1 | Cisco IOS XRv 9000 | GigabitEthernet0/0/0/1: 192.168.111.11/24 GigabitEthernet0/0/0/2: 192.168.112.11/24 GigabitEthernet0/0/0/3: 192.168.113.11/24 GigabitEthernet0/0/0/5: 192.168.12.11/24 GigabitEthernet0/0/0/6: 192.168.21.11/24 Loopback0: 10.11.11.11/32 MgmtEth0/RP0/CPU0/0: 172.21.116.110/24 |
| P2 | Cisco IOS XRv 9000 | GigabitEthernet0/0/0/1: 192.168.121.12/24 GigabitEthernet0/0/0/2: 192.168.122.12/24 GigabitEthernet0/0/0/3: 192.168.123.12/24 GigabitEthernet0/0/0/5: 192.168.12.12/24 GigabitEthernet0/0/0/6: 192.168.21.12/24 Loopback0: 10.12.12.12/32 MgmtEth0/RP0/CPU0/0: 172.21.116.120/24 |
| PE1 | Cisco IOS XRv 9000 | GigabitEthernet0/0/0/1: 192.168.111.1/24 GigabitEthernet0/0/0/2: 192.168.121.1/24 GigabitEthernet0/0/0/3: 192.168.101.1/24 GigabitEthernet0/0/0/4: 192.168.201.1/24 Loopback0: 10.1.1.1/32 MgmtEth0/RP0/CPU0/0: 172.21.116.10/24 |
| PE2 | Cisco IOS XRv 9000 | GigabitEthernet0/0/0/1: 192.168.112.2/24 GigabitEthernet0/0/0/2: 192.168.122.2/24 GigabitEthernet0/0/0/3: 192.168.102.2/24 GigabitEthernet0/0/0/4: 192.168.202.2/24 Loopback0: 10.2.2.2/32 MgmtEth0/RP0/CPU0/0: 172.21.116.20/24 |
| PE3 | Cisco CSR 1000V (Note: Cisco CSR 1000V runs Cisco IOS XE) | GigabitEthernet1: 192.168.103.3/24 GigabitEthernet2: 192.168.203.3/24 GigabitEthernet3: 192.168.113.3/24 GigabitEthernet4: 192.168.123.3/24 GigabitEthernet6: 172.21.116.30/24 (for Mgmt) Loopback0: 10.3.3.3/32: |
| VRF Name | VRF RD | Route-Target |
| Customer A | 65000:10 | 65000:10 (import/export) |
| Customer B | 65000:20 | 65000:20 (import/export) |
In this task we will enable RESTCONF support in cisco IOS XE devices, verify the RESTCONF configuration with the show command, and start a raw session with SSH Protocol. The task starts on the PE1 router, which runs Cisco IOS XR Software.
You will then continue the PE3 router, which runs Cisco IOS XE software.
User Access Verification
Username: cisco
Password:
RP/0/RP0/CPU0:Mar 26 18:21:07.829 UTC: exec[69085]: %SECURITY-LOGIN-6-AUTHEN_SUCCESS : Successfully authenticated user 'cisco' from 'console' on 'con0_RP0_CPU0' RP/0/RP0/CPU0:PE1#
NOTE : PE1 router initial configuration includes a management VRF that is named Mgmt-intf
RP/0/RP0/CPU0:PE1#configure
Tue Mar 26 18:24:18.466 UTC
RP/0/RP0/CPU0:PE1(config)#ssh server v2
RP/0/RP0/CPU0:PE1(config)#ssh server netconf
RP/0/RP0/CPU0:PE1(config)#ssh server netconf vrf Mgmt-intf
RP/0/RP0/CPU0:PE1(config)#
Note : In global configuration mode, use the Netconf-yang agent ssh command to enable NETCONF SSH Transport. Use the Netconf agent tty command to enable the NETCONF agent on tty lines. Use the root command to return to global configuration mode. Use the commit command to apply your changes.
RP/0/RP0/CPU0:PE1(config)#netconf-yang agent ssh
RP/0/RP0/CPU0:PE1(config)#netconf
netconf netconf-yang
RP/0/RP0/CPU0:PE1(config)#netconf agent tty
RP/0/RP0/CPU0:PE1(config-netconf-tty)#root
RP/0/RP0/CPU0:PE1(config)#commit
Tue Mar 26 18:34:56.117 UTC
RP/0/RP0/CPU0:P1(config)#do show netconf-yang status
Thu Dec 28 15:41:27.099 UTC
Netconf status summary:
state: ready
Note : The NETCONF protocol identifies the network device (such as a router) as the NETCONF protocol server and the management station as the NETCONF client. To start a NETCONF session, the client need to starts an SSH session to default NETCONF port 830 in the server. After the client authenticates, the NETCONF server sends a hello message that includes all server capabilities. The client responds also with a hello message that includes its own capabilities. At this point the session is open, and the client may send any RPC request to the server (such as get, get-config, edit-config, commit and others )
The hello message is delimited by a “hello” text at the beginning and end of the message.
Press the ctrl+c keys at the same time to return to the BASH command prompt.
Enter and provide login information to enter privileged EXEC mode. Use the access credentials that are provided.
User Access Verification
Username: cisco
Password:
PE3#
*Mar 26 18:55:22.581: %SEC_LOGIN-5-LOGIN_SUCCESS: Login Success [user: cisco] [Source: UNKNOWN] [localport: 0] at 18:55:22 UTC Tue Mar 26 2024
PE3#
PE3#configure terminal
Enter configuration commands, one per line. End with CNTL/Z.
PE3(config)#ip ssh vers
PE3(config)#ip ssh version 2
PE3(config)#ip ssh
PE3(config)#ip ssh sou
PE3(config)#ip ssh source-interface gi
PE3(config)#ip ssh source-interface gigabitEthernet 6
PE3(config)#
Note : Several log messages will display with some pauses in between them. In sample output for this step, some lines with text PE3(config) are intentionally removed.
PE3(config)#netconf-yang PE3(config)#*Mar 26 19:01:23.000: yang-infra: netconf-yang server has been notified to startPE3(config)# *Mar 26 19:01:26.855: %ONEP_BASE-6-SS_ENABLED: ONEP: Service set Vty was enabled by Platform*Mar 26 19:01:27.261: %ONEP_BASE-6-CONNECT: [Element]: ONEP session Application:com.cisco.nesd Host:PE3 ID:3832 User:NETCONF has connected.PE3(config)#*Mar 26 19:01:32.466: %ONEP_BASE-6-CONNECT: [Element]: ONEP session Application:com.cisco.syncfd Host:PE3 ID:3449 User:a has connected.PE3(config)#*Mar 26 19:01:34.603: %NDBMAN-5-ACTIVE: R0/0: ndbmand: All data providers active.
PE3(config)#do show platform software yang-management processconfd : Running nesd : Running syncfd : Running ncsshd : Running dmiauthd : Running nginx : Not Running ndbmand : Running pubd : RunningLog in with the credentials
$ ssh cisco@172.21.116.30 -p 830 -s netconfcisco@172.21.116.30's password: cisco<?xml version="1.0" encoding="UTF-8"?><hello xmlns="urn:ietf:params:xml:ns:netconf:base:1.0"><capabilities><capability>urn:ietf:params:netconf:base:1.0</capability><capability>urn:ietf:params:netconf:base:1.1</capability><capability>urn:ietf:params:netconf:capability:writable-running:1.0</capability>< output-ommited >Now the task completed.
You enabled the NETCONF protocol on Cisco IOS XR and IOS XE devices. You verify the NETCONF protocol status on Cisco IOS XR and IOS XE devices by using a CLI command.
You Verify the NETCONF protocol and started a NETCONF session over SSH to the Cisco IOS XR and IOS XE devices that point to each management interfaces.
You verify the Cisco IOS XR and IOS XE devices sent a hello message that include NETCONF capabilities after client login to the NETCONF service.
In the task we will explore the NETCONF YANG data model and use the pyang tool to analyze NETCONF RPCs. Also, you can describe how to map a YANG tree view to the XML language to construct RPC request.
The Task on the PE1 router that runs Cisco IOS XR software because it supports the listing of NETCONF capabilities with CLI commands.
Also you can perform such listing in Cisco IOS-XE software by using external tool such as netconf-console to retrieve the information of the device. The main purpose of this task is to explore the NETCONF data model, which is a standard IETF model with similar support for Cisco IOS XR and Cisco IOS XE software.
Data model are the programmatic way to configure and collect the operational data of a network device. They replace the process of manual configuration.
You can use data model to automate configuration tasks across heterogeneous device in network.
Data Models provide a well-defined hierarchy of the configurational and operation data of a router and NETCONF actions. The data models and programmed to provide a common framework of configuration to deploy across networks. The common framework helps you to program and manage network with ease.
Data Models help you manipulate configuration data, retrieve operational data and perform actions. The data models replace the process of manual configuration and are written in an industry-defined language. Although configurations that use CLIs are easier and human readable, automating the configuration with data model results in scalability.
The Data Models provide access to the NETCONF capabilities of the devices in a network by using the NETCONF protocol. If a device supports capabilities, it means that it is possible to use a data model to configure the specified capability.
The list of capabilities or data models that a device supports is included in the hello messages at the initiation of the NETCONF protocol exchange. Usually each capability associated with a data model. For example : the OSPF capability has a corresponding OSPF data model. The NETCONF capability has an associated data model.
Use do show netconf-yang capabilities | include /openconfig command to display the supported capabilities that related to OpenConfig
RP/0/RP0/CPU0:PE1(config)#do show netconf-yang capabilities | include /openconfig
Thu Aug 29 09:38:28.209 UTC
http://openconfig.net/yang/acl
|2017-05-26|*
http://openconfig.net/yang/aft
|2017-05-10|
http://openconfig.net/yang/aft/ni
|2017-01-13|
<output omitted>
http://openconfig.net/yang/types/yang
|2017-04-03|
http://openconfig.net/yang/vlan
|2016-05-26|*
http://openconfig.net/yang/vlan-types
|2016-05-26|
RP/0/RP0/CPU0:PE1(config)#
RP/0/RP0/CPU0:PE1(config)#do show netconf-yang capabilities | include cfg
Thu Aug 29 09:43:09.846 UTC
http://cisco.com/ns/yang/Cisco-IOS-XR-aaa-aaacore-cfg
|2018-09-04|
http://cisco.com/ns/yang/Cisco-IOS-XR-aaa-diameter-base-mib-cfg
|2015-11-09|
http://cisco.com/ns/yang/Cisco-IOS-XR-aaa-diameter-cfg
|2018-09-16|
<output omitted>
http://cisco.com/ns/yang/Cisco-IOS-XR-vservice-cfg
|2017-09-07|
http://cisco.com/ns/yang/Cisco-IOS-XR-wanphy-ui-cfg
|2015-11-09|
http://cisco.com/ns/yang/Cisco-IOS-XR-watchd-cfg
|2015-11-09|
RP/0/RP0/CPU0:PE1(config)#
RP/0/RP0/CPU0:PE1(config)#do show netconf-yang capabilities | include oper
Thu Aug 29 09:40:51.392 UTC
http://cisco.com/ns/yang/Cisco-IOS-XR-Subscriber-infra-subdb-oper |2015-11-09|
http://cisco.com/ns/yang/Cisco-IOS-XR-aaa-diameter-oper
|2017-09-07|
http://cisco.com/ns/yang/Cisco-IOS-XR-aaa-locald-oper
|2015-11-09|
<output omitted>
http://cisco.com/ns/yang/Cisco-IOS-XR-wanphy-ui-oper
|2015-11-09|
http://cisco.com/ns/yang/Cisco-IOS-XR-wd-oper
|2015-11-09| http://cisco.com/ns/yang/Cisco-IOS-XR-wdsysmon-fd-oper
|2015-11-09|
http://www.cisco.com/ns/yang/Cisco-IOS-XR-sysadmin-instmgr-oper
|2017-10-13|
http://www.cisco.com/panini/calvados/opertest1
|2016-10-12|
RP/0/RP0/CPU0:PE1(config)#
All these capabilities are defined in the NETCONF data model, which you will explore the following steps :
RP/0/RP0/CPU0:PE1(config)#do show netconf-yang capabilities | include netconf
Fri Aug 23 04:38:46.810 UTC
urn:ietf:params:netconf:base:1.1
| - |
urn:ietf:params:netconf:capability:candidate:1.0
| - |
urn:ietf:params:netconf:capability:confirmed-commit:1.1
| - |
urn:ietf:params:netconf:capability:interleave:1.0
| - |
urn:ietf:params:netconf:capability:notification:1.0
| - |
urn:ietf:params:netconf:capability:rollback-on-error:1.0
| - |
urn:ietf:params:netconf:capability:validate:1.1
| - |
http://cisco.com/ns/yang/Cisco-IOS-XR-man-netconf-cfg
|2018-05-04|
http://cisco.com/ns/yang/cisco-xr-ietf-netconf-acm-deviations
|2017-08-02|
http://cisco.com/ns/yang/cisco-xr-ietf-netconf-monitoring-deviations
|2018-04-09|
http://tail-f.com/ns/netconf/actions/1.0
|2017-02-28|
urn:ietf:params:xml:ns:netconf:base:1.0
|2011-06-01|
urn:ietf:params:xml:ns:netconf:notification:1.0
|2008-07-14|
urn:ietf:params:xml:ns:yang:ietf-netconf-acm
|2012-02-22|*
urn:ietf:params:xml:ns:yang:ietf-netconf-monitoring
|2010-10-04|*
RP/0/RP0/CPU0:PE1(config)#
After you know that a device supports a capability, the next step is to explore the YANG model where that capabilities is defined to learn how to configure that capability. However, before exploring the YANG model, you must download the model from the GitHub repository.
From GitHub you can download YANG models from standard organizations such as IETF, the IEEE, the metro Ethernet forum, open source such as Open Daylight, or vendor specific modules such as Cisco IOS-XR or Cisco IOS XE software.
Cisco Data Models on GitHub are organised by platform (including the CISCO XR, XE and NX Platform) and by software release number such as 6.5.3 for Cisco IOS XR software or 16.9.3 for Cisco IOS XE software.
Download to the PC.
Navigate to the directory, which contains all the supported Cisco IOS XR release 6.5.3 data model. From this directory you explore the Netconf data model.
vm:~/653$ ls openconfig*
openconfig-acl.yang
openconfig-aft-common.yang
openconfig-aft-ethernet.yang
<output-omitted>
openconfig-vlan-types.yang
openconfig-vlan.yang
openconfig-yang-types.yang
vm:~/653$ ls *cfg*Cisco-IOS-XR-aaa-aaacore-cfg.yangCisco-IOS-XR-aaa-diameter-base-mib-cfg.yangCisco-IOS-XR-aaa-diameter-cfg.yang<output-omitted>Cisco-IOS-XR-wanphy-ui-cfg.yangCisco-IOS-XR-watchd-cfg.yangCisco-IOS-XR-wd-cfg.yang
vm:~/653$ ls *oper*Cisco-IOS-XR-aaa-diameter-oper.yangCisco-IOS-XR-aaa-diameter-oper-sub1.yangCisco-IOS-XR-aaa-locald-oper-sub1.yang<output-omitted>Cisco-IOS-XR-wdsysmon-fd-oper-sub1.yangCisco-IOS-XR-wdsysmon-fd-oper.yang
vm:~/653$ ls *netconf*Cisco-IOS-XR-man-netconf-cfg.yangcisco-xr-ietf-netconf-acm-deviations.yangcisco-xr-ietf-netconf-monitoring-deviations.yangietf-netconf-acm.yangietf-netconf-monitoring.yangietf-netconf.yangThe pyang tool is a YANG validator, transformer and code generator that was written in Python. You can use to validate YANG modules for correctness, transform YANG modules into other formats, and generate code from the modules.
The pyang tool can have a following feature :
Observe that the output lists the NETCONF RPC methods.

From the pyang tree view, it is possible to create an XML file where YANG containers and leaves become XML tags. Use pyang to display the tree view of get-config RPC in the ietf-netconf.yang model


In this task, you will interact with the NETCONF protocol in a raw session to use the framing format that Cisco IOS XR device use. Also you will identify the necessary steps to perform changes in the NETCONF configuration database.
After the client sends a hello message with the listed capabilities to the NETCONF server, the server is ready to listen to RPC requests. You will test NETCONF over an SSH session, which provides a raw session. In a raw session, RPCs must follow NETCONF chuck format framing.
This requirement means that every RPC must be preceded by the # character that is followed by a number of bytes that the client is going to send. In addition the RPC must end with a couple of # characters. Next you see an example of an RPC that uses chunk format framing.

You will use the raw session only in this lab for learning processes. In following we will explore more on powerful tools, such as netconf-console, yang-explorer and ncclient.
NETCONF Edit Configuration Database Best Practice.
Cisco IOS XR software uses the candidate configuration as the edit configuration database. This usage means that you should make every edit-config RPC in the candidate database and follow it with a commit RPC.
As a best practice, Cisco recommendation that you use the lock and unlock RPC before the edit-config and after the commit, respectively.

Use ssh cisco@172.21.116.10 -p 830 -s Netconf
Note : xml response from the NETCONF server displays.
$ ssh cisco@172.21.116.10 -p 830 -s netconf
Password: cisco
<hello xmlns="urn:ietf:params:xml:ns:netconf:base:1.0">
<capabilities>
<capability>urn:ietf:params:netconf:base:1.1</capability>
<capability>urn:ietf:params:netconf:capability:candidate:1.0</capability>
< output-ommited >
<capability>http://openconfig.net/yang/bgp-policy?module=openconfig-bgp-policy&revision=2017-02-02</capability> </capabilities>
<session-id>578585380</session-id>
</hello>
]]>]]>

Return to NETCONF session in Terminal and paste the content. Verify that the PE1 router responds with its whole configuration.
Note : The purpose of the get-config RPC to get the running configuration on the device.
Make sure from router to initiate the connection you should send Hello RPC XML.
Get-config RPC XML block example

Return to the terminal paste the content. Verify the PE1 returns on RPC-Reply response that includes a summary of IP access-list and prefix-list configurations.

Select and copy the get RPC (the third XML block in the file)
Output that you will get:


Make sure copy the text from line that starts with the #958 characters to the next line that contains the ## character. The RPC creates an access list in the candidate configuration. Then return to Terminal.
In NETCONF session, press Enter and then paste the edit-config RPC content. Observe the OK message in the RPC-Reply at the end of the output.

Select and copy the commit RPC XML block. Return to the NETCONF session in the terminal press enter. And paste the content. Observe that the PE1 router returns an rpc-reply response that includes the OK tag.

Make sure you copy text from the line that starts with #111 characters to the next line that contains the ## characters. This RPC applies the candidate configuration to the running configuration.
Return to Terminal. In the NETCONF session, press Enter and then paste the commit RPC content.

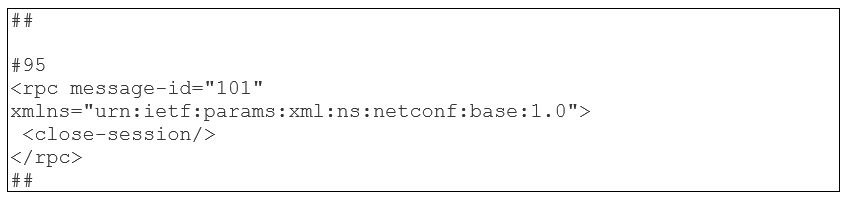
NETCONF session return the rpc-reply

After completion of the lab ·
In this task you will interact with the NETCONF protocol in a raw session to use the framing format that Cisco IOS XE device use.
Also you will enumerate the steps to perform changes in the NETCONF configuration database.
NETCONF Framing in Cisco IOS XE Software
After the client sends a hello message with the listed capabilities to the NETCONF server, the server is ready to listen to RPC requests.
In a raw session like the NETCONF session that SSH provides, RPC requests must end with the ]]>]]> characters


As a response from the device, you will see that PE3 router interface lookback 0 configuration

RPC-Reply


Observe OK message in the rpc-reply at the end of the output.

After completion of the lab
The table describes the commands that you will use in this activity. The commands list in alphabetical order so that you can easily locate the information that you need. Refer to this list if you need configuration command assistance during the lab activity.
| COMMAND | DESCRIPTION |
| commit | Applies changes from the pending configuration to running configuration |
| configure | Enters global configuration mode |
| do | Allows you to run EXEC commands from any configuration mode |
| netconf agent tty | Configures the NETCONF agent to listen on TTY lines |
| netconf-yang agent ssh | Configures the NETCONF agent to use SSH as the transport protocol |
| root | Returns to global configuration mode |
| show netconf-yang capabilities | Displays a router-supported capabilities list |
| show netconf-yang status | Displays NETCONF agent status |
| ssh server netconf | Configures the SSH server to support NETCONF support |
| ssh server netconf vrf vrf-name | Specifies the VRF that the NETCONF agent uses |
| ssh server v2 | Enables SSH Server (SSH Version 2) |
| COMMAND | DESCRIPTION |
| configure terminal | Enter global configuration mode |
| do | Allows you to run EXEC commands from any configuration mode |
| ip ssh source-interface interface-type interface-number | Specifies the interface to use as a source of SSH traffic |
| ip ssh version 2 | Enables SSH Server (SSH Version 2) |
| netconf-yang | Enables the NETCONF YANG agent |
| show platform software yang-management process | Displays the status of NETCONF-YANG processes |
| COMMAND | DESCRIPTION |
| cd path | changes the working directory to the specified path |
| pyang -f tree --tree-depth level yang-data-model | Uses the pyang tool to display the tree view of the specified data model file with the specified depth level |
| pyang -f tree --tree-depth path yang-data-model | Uses the pyang tool to display the tree view of the specified data model file starting from the specified path |
| ssh user"device-ip -p port -s netconf | Starts an SSH NETCONF session to the specified device IP address by using the specified user and port |
 Launch your Graphy